About - Production
The production of an animation film consists of a number of stages. The exact nature of those depend on the studio: a Pixar movie will be more involved that a short film by an independent animator. I will describe here how I do things, but there will be common elements with any animation production. This is necessarily brief, but over time I'll add more details in other areas of this site.
Story
Without a story the result on the screen is eye candy, not engaging entertainment. A story can come from anywhere: it could be the adaptation of an existing story, or it could be an original story idea. One of my films is a form of adaption in that it takes an existing radio play and uses the voices as dialog for the film. In another, I added visuals to an audio recording of a narrated story.
Screenplay
The screenplay is a description in written form of the movie, like a blueprint. It is way for writers to communicate their ideas to a director. This can be tricky, as writers should be careful about giving very specific instructions such as to the kind of shots they envision. These details are decided by the director in collaboration with the cinematographer and is fleshed out in a version of the screenplay called the shooting script. If you are a writer-director, which is often the case for independent productions, this type of conflict is less of an issue. Still, I believe that the initial screenplay should shy away from being a shooting script and give the story a change to develop on its own.
To arrive at a screenplay, the story is divided into scenes. A scene is headed by an indication of the location and the time of day, and further consist of actions, i.e., what is happening, and any dialog spoken by the characters in the scene. As a rule of thumb, a new location or a change of time asks for a new scene. Screenplays are formatted in a particular way, such that, on average, one page in the screenplay corresponds to one minute in the movie. Here is a snippet from The Alley (under development):
INT. SIMON'S WORK ROOM - AFTERNOON
               The room is small, with a desk in the corner and bookcases
               along the walls.  On the desk: monitor, keyboard, mouse, and
               various papers.  At the desk: SIMON HAYWARD, a young man in
               his late 20s.  He stares at the typescript he is holding,
               titled: "Lost in Cyberspace, by Simon Hayward".
                                     SIMON
                              (grunting)
                         Rubbish!
The fragment starts with the scene heading, which tells us that this is an INTERIOR (INT) scene (filmed indoors), that the location is the work room of someone named Simon, and that it is the afternoon. Scene headings can be quite elaborate. For example, they can indicate that the scene plays in the past (flashbacks), or that it takes place in a moving car.
Under the scene heading is an action. Actions include a description of the location on first mention: here we learn a bit about Simon's work room. Actions also serve to introduce characters, which is indicated by giving their name in all uppercase: SIMON HAYWARD. In general, this is only done for characters with a speaking role. The introduction will include a short description of the character, but only in as far as relevant. Finally, there is an actual action: Simon holds a typescript and stares at it.
The fragment ends with a short dialog, where Simon grunts his discontent about his work. Dialog is headed by the name of the character (often just first or last name), sometimes a direction in parentheses, such as "grunting", and finally the spoken words. As film is a visual medium, dialog should be used sparingly.
The completed screenplay will provide us with an idea of the characters and the necessary locations, so it is time for casting and location scouting. Except, that in animation, everything needs to be designed from scratch, so, instead, we will begin our character development and set design. These steps may be preceded by developing a storyboard, where the scenes of the film are sketched out. Here is an example (from ANM 104 Animation Design, Kalamazoo Valley Community College):
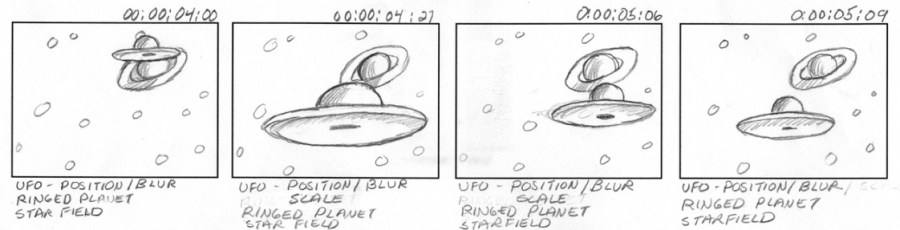
Alternatively, for 3D animation, the storyboard could be created after character development and set design by taking still shots of the 3D environment. This is akin to using previz software. As an experiment, I started doing this for The Alley, using Reallusion's iClone, my main animation software.

On the left is the original iClone scene. Buildings are simple blocks, as detail is not needed. The middle image was created using edge detection in a graphics editor. In the image on the right, the outlines were enhanced and shading was added by tracing over the middle image with a digital pen.
Character Development
Backstory
Part of the initial character development takes place during the writing phase. The writer may give a description and, in addition, may provide a backstory, which tells us what happened to the character up to the point that the story begins. None of the backstory may actually be revealed explicitly but it will facilitate character development. As always, there is debate as to how much backstory is needed or relevant. If you are both writer and director, you have the luxury to keep things vague and let the character reveal things about him or herself during the story.
Appearance
To specify a character we look at a number of features: male or female, age, physiognomy, clothing, and face. Of these, the face would be the most "characteristic" and one way to achieve this is by starting with a photograph of the desired face and map this face on the 3D model of the character. In some case the original photo is transformed further or is a combination of several photos. I have made use of the Face Research website (no longer available) to accomplish that. Below is an example showing the original photo, the transformed photo, and the resulting character (Keith Cameron from The Case of the Two Fiancées):
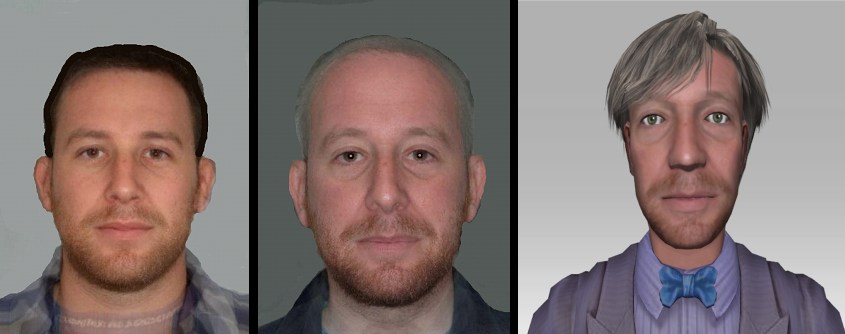
This character was done in 2010. There is a certain resemblance, but the most important factor is that the character is recognizable within the cast and gives the impression dictated by the screenplay. For example, Keith is described as a "handsome, but arrogant, Broadway star."
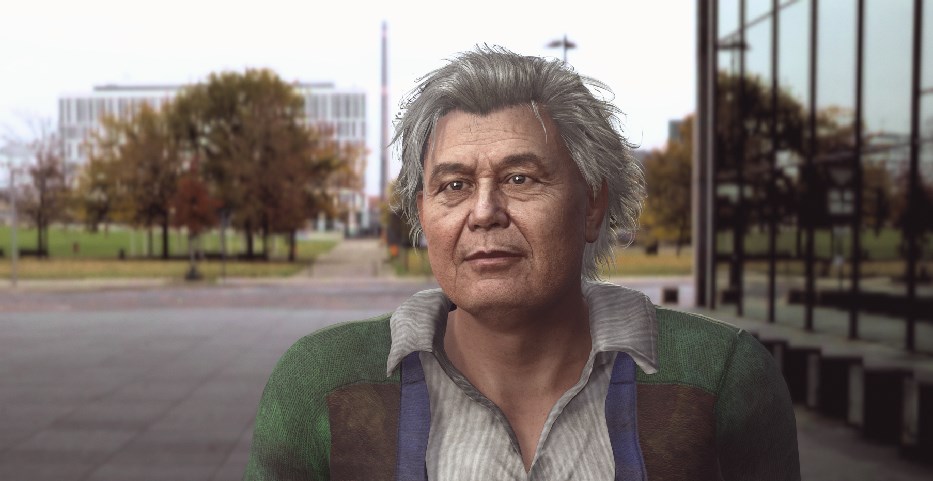
In 2015, Reallusion added Character Creator, which allows the creation of high-quality characters. The face mapping is done via the HeadShot plugin, which was first introduced in 2019 and gives excellent results. Below is an example of a character I created in 2020. The initial face image to create the face is AI-generated and is a "person that does not exist", as provided for example by https://generated.photos/face-generator.
Voice
The voice of a character also contributes to the characterization, so one area where actual casting plays a role is during the selection of voice talent. An alternative is to use synthetic speech, but the nuances of spoken dialog are not captured very well. For this reason, I have used voice talent for The Third Wish, a film I completed in 2016.
However, in the last few years the quality of synthetic speech has greately improved, thanks to the use of AI. It is therefore quite feasible to voice characters that way, especially where voice talent is not readily availble.
Set Design
Every story will take place at one or more locations, and, for an animation film, these locations, or sets, need to be designed. This requires a lot of research, especially if the story unfolds in a period other than the current. For Pinhead's Dilemma I had to recreate late 1950's England. Fortunately, people place their old photos online and even create models of the place where they grew up to publish at 3D Warehouse. Thus I was able to come up with a believable and convincing location, even to British viewers:

Models that require a detailed interior, such as the coffee shop above (second from the right), I usually model myself and then convert to be suitable for use in my animation software.
Creating a Scene...
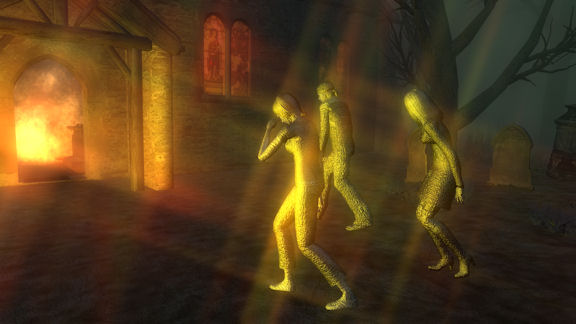
With all parts in place, we are now ready for the actual "filming". Of course, film is no longer involved, but it's a handy term for the creation of a series of moving images. Each scene in the screenplay is turned into a project that contains the necessary buildings, environment, props, and characters. The lighting is adjusted to reflect the time of day or the amount of interior lighting. Effective lighting and related effects are a great way to set the mood of a scene:
Characters and moving props are animated and dialog is added for speaking characters to generate the appropriate mouth movements (lip-synching). The resulting animation is then "recorded" in the form of an image sequence. This process is repeated for each scene.
Post-production
The resulting image sequences are imported into a video editor, where they are combined with the dialog, sound effects, and music tracks.